Monday, September 25, 2023

Oldie Moldie Monday Does A Challenge

It is Monday - time to show some love for your old supplies.  I am going to combine Oldie Moldie Monday with the current challenge at 52 Christmas Card Throwdown. The challenge this week is technique but more specifically to use a stencil.  

I have a large assortment of stencils.  Many times I try the stencil out and then the image goes in a box to be created with later.  Needless to say I have a large box with "created with later" images.  This snowflake stencil is one of them.  It may be a Gina K Stencil.


Here is the snowflake all stenciled in beautiful blue colors.  I am guessing it is oxide inks.  I made it a long time ago.  It is a beautiful stencil.  It is very large.  I decided to make two mini slimline cards out of this large snowflake.  I have a die for mini slimline cards so used that to make my snowflake panels.


I found some cardstock that worked well for the mat of the snowflake.  I also found this glitter paper which I covered the front of the card base with.  I have a very large collection of snowflake dies and cut some out of the same color cardstock I used for the mat.  I splattered the card with irridescent ink and added some bling to the middle of the snowflakes.  A simple greeting completed the card.  I now have two more holiday cards completed.

Remember to show some love for your old supplies.  They still make wonderful cards.

Sunday, September 24, 2023

Fall Leaves Take 3

Fall and leaves are some of my favorite subjects to create cards for.  I love the colors of fall, the weather and the changes in our world.  I do not look forward to winter but it is another opportunity to create differently.

This month the challenge at The Male Room is leaves.  A challenge right from my heart. 

I fell in love with the new leaf dies from Tim Holtz.Artsy Leaves.  I gathered together all different colors of paper and dark brown cardstock and started die cutting.  I made 5 of these cards.  One will be sent to my youngest brother.  I like the sentiment - everyone always needs a little extra happiness in their lives.


I fell in love with the new leaf dies from Tim Holtz.Artsy Leaves.  I gathered together all different colors of paper and dark brown cardstock and started die cutting.  I made 5 of these cards.  One will be sent to my youngest brother.  I like the sentiment - everyone always needs a little extra happiness in their lives.


Thanks for stopping by - stay tuned for more fall creations.

Monday, September 11, 2023

Oldie Molde Monday

 It is Monday, time to show some love for your old supplies.

I had these stamped rainbows in my supplies so I finally made them into cards.

They will either go to the foster care home or to some friends going through a difficult time.


Remember to use those stamped images you have.  They make wonderful cards.

Wednesday, September 6, 2023

Two Challenges Together

I am returning to cardmaking slowly and I thought some challenges would help me be creative.

I chose the sketch challenge from 52 Christmas Card Throwdown.


I also am doing the theme challenge at Paper Players.  The theme is four legged friends.  


Here is my card.  This image has been floating around the design tables for quite awhile.  I have several great nieces who are cat lovers so thought this would be a perfect card for one of them.  The paper is also old.  This really could be an oldie moldie Monday post since all the supplies are very well aged.

I used a square die to make my card base and cut the base patterned paper with the same die.  I did take liberty with the sketch by adding the contrasting stripe in the background.  Yay - one more Christmas card done.


Thanks for stopping by.  


September Stencil Challenge For Happy Little Stampers

It is time for a new challenge at Happy Little Stampers using your stencils.   As always, the stencil challenge is "anything goes".

Stencils are such an economical way to add supplies to your card making arsenal.  Stencils have also evolved over the years and it is amazing what you can do with a stencil.


I used a stencil and mask from A Colorful Life.  I started with cream cardstock and used the open stencil to add a base layer of color to the leaf.  I then took the stencil with the veins and added all the beautiful colors that you see on leaves in the fall.  I was using my oxide inks.  After I had added the color, I came back in and smoothed all the colors together with a light brown ink.  I fussy cut the leaves.

I traced the leaf pattern and cut it out of gold vellum to place behind my leaf.  I decided I wanted a more colorful background for my leaf so went to my cardstock and found four fall colors and cut diagonal stripes in the paper (I have stripes for three more cards - luckily I made 4 leaves).  I die cut the word hugs from dark brown cardstock and several layers of kraft to give it a little dimension.  I matted my striped background with dark brown cardstock and adhered it to a kraft card base.  Gold splatters completed the card.


Here is a card made with the negative of the leaf.  After I have done the stenciling, I sprayed the stencil with water and smooshed it onto a piece of cardstock and got the leaf outline.  I had a small stamp set with oak leaves so stamped them in fall colors and scattered them around the card.  I stamped a sentiment.  Gold splatters completed this card also.


Please join us at Happy Little Stampers and play with your stencils.

Thanks for stopping by.


Monday, September 4, 2023

September Christmas Challenge for Happy Little Stampers

It is time for a new Christmas Challenge at Happy Little Stampers.

The challenge at Happy Little Stampers is always anything goes but there is always an option for your design.  This month the option is Snow Globe.  I chose to do anything goes.


For my card this month I used another Colorado Craft stamp I had purchased a year or two ago and had not used.  (It feels good to use some of this product we had to have and then did not use immediately.)  The stamp is quite large.  I actually stamped it four different times and used different types of embossing powder for the image.  I am sharing two of the images on cards today with you.  The other two are still in the thinking pile.

I used white embossing powder for the image on this card.  The pink color is a colored powder that you sprinkle on and spray with water.  You get some great variations of color by doing it this way.  The pink color is so bright.  I have always love black, white and pink for a color combination so decided to make a very nontraditional card.  I trimmed the ornament panel.  One side has been slightly removed.  I matted the image with black cardstock.  I adhered a piece of my favorite black and white stripe (from My Favorite Things) to the front of my white card base.  I added a small strip of shiny black cardstock at the bottom of the card.  I adhered the image over the top of the finished card front.  I cut the sentiment from the shiny black cardstock.  Three small shiny black dots were added to the upper right corner to add some balance to the card.


Here is my second card using the same image.  This is a mini slimline card.  The bulb was trimmed quite abit for this card front.  I stamped the image with an oxide ink and used clear embossing powder.  I colored the image in with the same color of oxide ink.  The image was matted with two different colors of cardstock and adhered to a white cardbase.  The sentiment was embossed in gold embossing powder on one of the colored cardstocks.  Gold splatter completed the card.

Thanks for stopping by.

Oldie Moldie Monday

 It is Monday - time to show some love for your old supplies.

These cards were made from a very old collection of papers I could never part with.  The frogs were so cute and I knew they would make cute cards.  I have been working on a box of cards for a foster care home and I knew these cards would make the kids smile.


Remember to use your old supplies, they still make wonderful cards which will bring a smile to someone's face.

Sunday, September 3, 2023

September Birthday Challenge for Happy Little Stampers

 It is September and it is time for a new birthday challenge at Happy Little Stampers.  

This is a wonderful challenge because it helps you plan ahead for the upcoming birthdays where you will need a card - or like me - a very much belated birthday card.  This challenge is great because the theme is always anything goes.


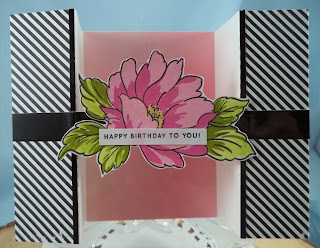
I chose to make a bridge card for my birthday card this month.  Jennifer McGuire has several videos on You Tube that tell you how to make one and I used her directions and measurements for the card I created.

The flower is from Altenew.  I had stamped several of these awhile back and had them all ready to use.  I also had the sentiment stamped.  

I took my heavyweight white cardstock to make my white card base using Jennifer's measurements.  I cut the pink paper to fill in the center section of the card.  I believe this paper is from Altenew also.  The black and white stripe is from My Favorite Things.  They have a 6 x 6 pad of black and white striped paper.  I cut a shiny black strip of cardstock for the middle of the card to help make the bridge.  Very thin strips of the black shiny paper were cut to edge the folded edge of the sides.  


Here is a picture of the card folded out open and flat.  The black strip is just glued to the striped edges.  


Here is a picture of the card folded so it lies flat in an A2 envelope.  I believe I will put the card in this envelope inside a larger envelope just to protect it a little better.  The US Postal Service has gotten pretty good at destroying our beautiful cards.


Just search bridge cards on You Tube and you will find many different ways of making them.  Have fun and try this fun fold.


Thanks for stopping by.